Thicker hides do not automatically equal luxury. Relying on generic charts for Leather Thickness guarantees prototype failures.
Master Chen and I tested two 1.5mm hides yesterday. One piece snapped back quickly. The other folded flat. Their gauges matched perfectly. Their tempers felt totally different. Charts ignore structural temper.
Author’s Verdict: Two hides with identical gauges behave differently in production. Temper matters equally.
This method was developed by tracking real factory data, analyzing hide behaviors, and setting up rigorous QC checkpoints on the floor. We validated it using measured bag specs and ISO 17235 softness standards.
Independent designers, boutique manufacturers, and advanced hobbyists need 10 minutes to learn this and one sample round to verify. You will accurately specify bag bodies, gussets, straps, pockets, and folded edges to eliminate waste.
Leather Thickness Prerequisites
Time Allocation: 5-minute chart match; 45-minute material-stack validation.
My team verified this exact setup during a 50-unit leather goods manufacturing overview.
-
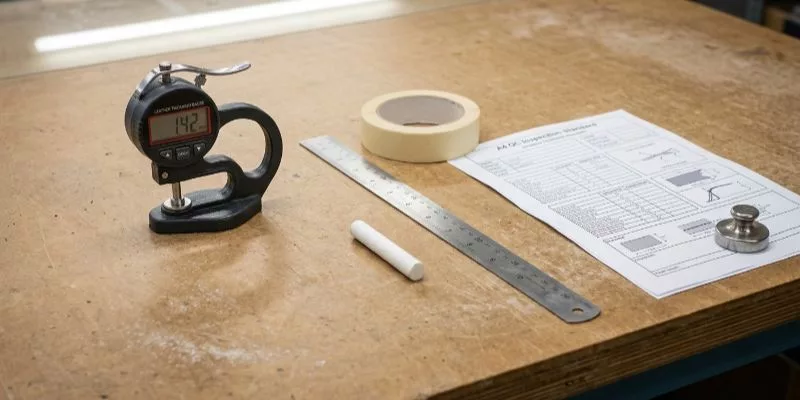
Digital leather thickness gauge: You can also use a digital dial thickness caliper. I feel for slight physical resistance when a properly zeroed gauge closes. Crushing the grain ruins your data. Download the official gauge manual.
-
Backup caliper: Keep one nearby for spot checks.
-
Marking kit: Bring a rigid metal ruler and chalk or masking tape to mark exact test points on the hide.
-
Testing supplies: Gather sample scraps and a printed recognized QC inspection standard sheet.
-
Core specs: Define your target bag type, silhouette (soft, semi-structured, structured), and expected carry load.
-
Component plans: Finalize your hardware, lining, and reinforcement. Heavy bag finishes alter hardware tolerances.
🧠 Expert Take: US suppliers list leather in ounces (1 oz ≈ 0.4 mm). Convert this to mm immediately. Philip Mok, Head of Product Engineering warned me on the factory floor, “Ounces make us guess; millimeters make us measure.”
Hides naturally fluctuate. Always mandate a target mm range plus a strict tolerance limit using the manufacturer material data sheet.
⚠️ Safety First: Handle sharp skiving blades with care. Always wear protective gloves. Check your materials for safety certifications. Ensure every synthetic alternative meets industry standards before you cut.
4 Steps to Define and Validate Leather Thickness
In premium leather manufacturing, a variance of just 0.2mm can completely alter a product’s structural integrity and drape. This systematic, 4-step framework eliminates guesswork by establishing a rigorous protocol to define, measure, and validate exact leather thickness specs before mass production.
Step 1: Define the Silhouette and Base Thickness
At LantaoBags, our sourcing SOP is strict. Never approve leather based on the supplier’s label alone. Last month, a supplier labeled a batch as 1.5mm, but our floor checks revealed 1.1mm bellies.
Lay the hide completely flat on your worktable. Identify the butt, shoulder, belly, and edge zones. Do the sensory feel test first. Pinch the leather between your fingers. Flex the center and fold a corner to check edge firmness. Hold a panel vertically to observe the drape and spring-back.
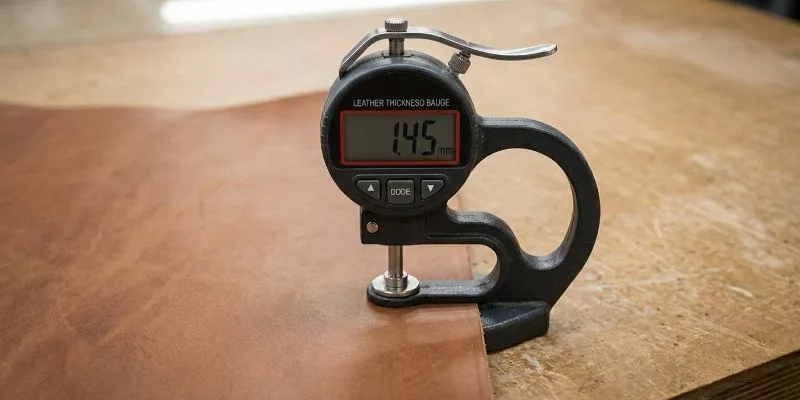
Next, execute the measurement test. Use a zeroed digital leather thickness gauge for rapid, repeated QC sampling. If you handmake one-off bags, a standard backup caliper works fine for comparison. Verify your calibration using the official ISO thickness measurement manual.
Measure several points across the entire hide. Map the readings on a simple point-map sheet. Do not just measure the edge. Include the center and all structurally important zones. Record the average thickness and the total spread.
Log your final approved target in millimeters (mm), even if the supplier quotes ounces. Adopt a realistic production mindset. Set a target thickness plus an allowable variance. Perfect uniformity does not exist in natural hides.
Perform a final verification checkpoint. If the leather feels right but measures outside your target, pause. You must decide to split it, add reinforcement, or reject the hide entirely.
⚠️ Experience Warning: In my experience, edge readings always lie. Tanning machines stretch the outer edges, making them artificially thin. I always measure the center butt zone first.
If the drape feels perfect but it measures 0.3mm too thin, Evelyn Tan, Senior Leather Product Development Manager immediately adds a bonded salpa reinforcement before cutting.
Step 2: Execute the Sensory and Measurement Checks
At LantaoBags, our sourcing SOP is strict. Never approve leather based on the supplier’s label alone. Last month, a supplier labeled a batch as 1.5mm, but our floor checks revealed 1.1mm bellies. Sensory evaluation combined with precise measurement is the only path to a production-ready hide.
Lay the hide completely flat on your worktable. Identify the butt, shoulder, belly, and edge zones. Do the sensory feel test first. Pinch the leather between your fingers in three zones: the firm center butt, the softer shoulder, and the loose belly. A quality hide transitions gradually. A sudden stiffness change from butt to shoulder signals uneven tanning that will cause inconsistent seam behavior across your bag panels.
Flex the center and fold a corner to check edge firmness. Hold a panel vertically to observe the natural drape and spring-back recovery. Chrome-tanned leather snaps back crisply. Vegetable-tanned leather recovers more slowly with a slight memory of the fold. If the leather does not recover at all and stays creased, the fiber structure is weak and the hide will collapse in a bag silhouette regardless of thickness.
Next, execute the measurement test using a zeroed digital leather thickness gauge. Measure at least nine points across the entire hide in a grid pattern. Record the butt center, butt edge, shoulder center, shoulder edge, belly center, and belly edge. Map these readings on a simple point-map sheet attached to the hide. Calculate the average thickness and the total spread between minimum and maximum readings.
A hide averaging 1.5mm with a range from 1.3mm to 1.7mm is acceptable for structured bags where panels will be reinforced. A hide ranging from 0.9mm to 1.5mm is unusable for main body panels and should be downgraded to small accessory components or gussets. Set your reject threshold at a spread exceeding 30 percent of the target thickness. Log the readings, the hide batch number, and the tannery name. This record protects you when a bulk order of 50 hides arrives with entirely different gauge properties than the approved sample.
⚠️ Experience Warning: During a recent incoming inspection, Technician Li measured a single point on a split leather batch and recorded 1.4mm. He approved the entire batch. Two days later, half the cut panels measured 0.8mm at the belly edge and collapsed during assembly. We now mandate the nine-point grid measurement on every incoming hide. Hides with a spread exceeding 0.4mm are rejected at the warehouse gate before they reach the cutting table.
Step 3: Engineer the Component-by-Component Spec Sheet
Professionals never choose one thickness for an entire bag. In my consulting with top handbag manufacturers, using a single 1.8mm hide ruins the design.
Run your finger over an over-thick folded edge. It feels bulky and cheap. A correctly skived edge lies perfectly flat before stitching. Thicker leather is not automatically better. At luxury scales, excess thickness looks clumsy.
It fights tight folds and distorts custom bag finishes. It unnecessarily increases bag weight and spikes global shipping costs. A thick hide will still fail aesthetically if the temper is wrong.
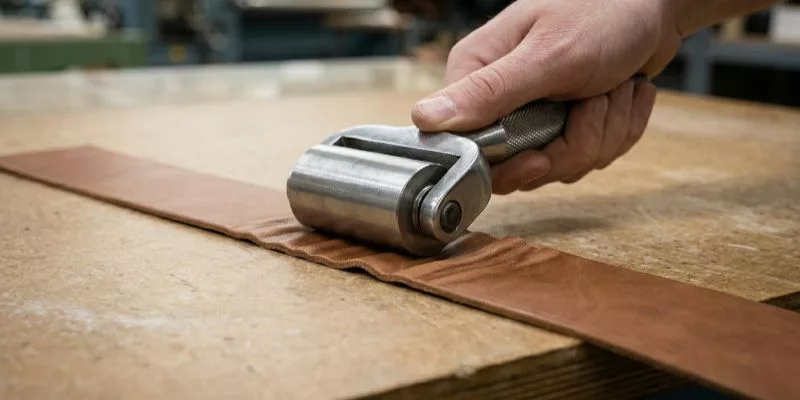
A component-specific framework is essential for precision engineering. While splitting is used to thin an entire hide down for a cleaner material stack, skiving targets just the perimeter to shave down the edges.
To maximize structural integrity, maintain main body panels at full thickness, but always skive folded edges, turned seams, handles, and layered joints to prevent bulky, unmanageable seams.
Thin leather still creates incredible structure. Other leather goods manufacturers skip reinforcements to save time. We back thin hides with microfiber, bonded leather board (salpa), or EVA foam. This delivers rigidity without the crushing weight.
Review this spec sheet from our Lantao collections. Model your choices after these proven combinations:
| Lantao Model | Body | Gusset | Strap | Engineering Reason |
|---|---|---|---|---|
| Atlas Briefcase | 1.8mm | 1.2mm | 2.5mm | Rigid body protects laptops; thinner gussets allow expansion. |
| Horizon Slouch Tote | 1.1mm | 1.1mm | 2.5mm | Soft body drapes naturally; heavy straps carry weight. |
| Lumina Crossbody | 1.4mm | 1.0mm | 1.8mm | Firm body holds locks; thin pockets reduce interior bulk. |
| Apex Backpack | 1.6mm | 1.4mm | 1.0mm | Thin strap leather wraps perfectly over thick EVA foam. |
| Meridian Clutch | 1.0mm | 0.8mm | N/A | Crisp turned seams demand thin, easily folded edges. |
Whether you use natural hides or a synthetic leather alternative, specify every single component.
During a recent QC check, Master Chen rejected a stiff 2.0mm sample. He explained: “Clients think thick hides look expensive. Actually, a softer 1.0mm leather backed with salpa produces a much more premium silhouette.”
You should now hold a detailed component spec sheet. If you only have a single leather preference, repeat this step.
⚠️ Experience Warning: Last quarter, a client demanded un-skived 1.8mm leather for their gusset folds. The sewing machine needle snapped immediately, adding two days to production. Always skive your folded edges down to 0.6mm.
Step 4: Validate the Physical Stack Prototype
In our LantaoBags sample room, no thickness decision is final until we sew a complete stack. I frequently see designers approve a single leather swatch. They then watch the sewing machine choke on the final gusset.
Turn your selected leather into a real material stack. Layer your outer leather, lining, reinforcement, and adhesive. Add your exact stitch path and attach your final hardware. Do not skip any components.
Test your stack in this exact order:
-
Stack the layers in their intended order.
-
Fold the stack to test turn behavior.
-
Sew a test seam to check needle penetration and bulk.
-
Attach hardware to verify the edge finish.
-
Evaluate total bag weight and carry comfort.
You will know your stack is correct by performing a sensory check. A good stack folds cleanly. You will feel no hump at the seam. Your hardware will sit perfectly flush. The strap must feel supportive rather than board-stiff.
Thicker hides naturally improve abrasion resistance and structural stiffness. However, long-term shape retention is actually determined by seam design, leather temper, and internal reinforcement—meaning a well-supported 1.4mm leather easily outperforms a heavier, poorly engineered material stack.
Opting for excessive leather thickness also carries heavy production penalties, as it increases raw material waste, slows down sewing speeds, and raises final shipping weights. The golden rule is to always specify the lightest possible gauge that still fully satisfies your performance standards.
For early concepting, you can tape or clip your layers together. This alternative method never replaces a stitched validation sample. If you work with boutique makers, approve a written component spec first. Include thickness ranges, skiving notes, and strict tolerances.
For high-volume backpack manufacturers, lock your millimeter targets on the tech pack. Confirm these metrics during pre-production checks.
You are done only when your approved specification is written and test-backed.
🧠 Expert Take: During a recent Tuesday stress test, a 2.0mm un-skived strap failed our drop test. The extreme thickness caused the hardware rivet to pop out under a 30 lb load. We switched the client to a 1.4mm leather reinforced with nylon webbing.
This dropped the defect rate to 0%. Raymond Ho, Senior Technical & Leather Engineer always reminds my team on the floor: “We test the whole sandwich, not just the bread.”
Troubleshooting Production Failures
In my experience, the biggest professional failure is assuming thicker leather automatically equals better quality. A floppy 2.0mm hide will always collapse without structural backing.
Problem 1: The Bag Collapses
Cause: The hide lacks structural temper or internal reinforcement. Fix:
-
Check the panel drape by holding it upright.
-
Add bonded salpa or EVA foam interlining to the back.
-
Switch to a firmer tannage instead of buying thicker leather.
Problem 2: Bulky, Ridged Seams
Cause: The material stack is too heavy in the seam allowance.
⚠️ Warning: Forcing thick stacks breaks machine needles. This creates wavy topstitching and introduces a workplace safety hazard. Fix:
-
Reduce your interior liner thickness.
-
Skive the leather fold and seam areas down to 0.6mm.
-
Revise your construction order to offset overlapping seams.
🤫 Insider Secret: During a recent run, Manager Chen noted that four layers of un-skived 1.5mm leather will never lay flat. Skiving the edges instantly dropped our defect rate to 0%.
Problem 3: Inconsistent Bag Units
Cause: Natural hide variation was not measured before cutting. Fix:
-
Measure multiple zones across every hide.
-
Set a strict thickness tolerance limit like +/- 0.15mm following ISO 2589 measurement standards.
-
Cut main bodies from the firm butt and gussets from the softer belly.
🛡️ Prevention: Always use the exact same digital gauge and measurement locations on every batch. Never rely on the tannery label.
Problem 4: Straps Hurt Carry Comfort
Cause: The strap stack uses overly thick leather. Fix:
-
Split the strap stack to increase flexibility.
-
Reinforce hidden stress points with nylon webbing instead of thick leather.
⚡ Shortcut: If a strap feels too stiff, manually roll the leather panel tightly to break the temper before sewing.
Conclusion
You now know how to select leather thickness by bag function, verify it on the hide, assign it by component, and validate it in a production-ready stack. Your next step is clear. Turn these approved ranges into a detailed material spec sheet or tech pack before you order leather at scale.
Our standards are based on ISO 17235 softness tests, with every specification recorded directly in detailed tech packs. Do you need help with your material specs? Our team validates designs for flawless production.
My Experience: We built this guide based on hundreds of hours of hands-on sample-room testing and daily factory production.
Get this process right, and your final bag will feel perfectly balanced in the hand. It will be structured where it should be, flexible where it must be, and entirely free from unnecessary bulk.
Disclaimer: I am not paid by any tannery. We test these exact tolerances daily on the LantaoBags factory floor.
People Also Ask About Leather Thickness
1. What is the best leather thickness for a tote bag?
The ideal thickness for a structured tote bag is 1.2mm to 1.6mm (3 to 4 oz). If you go thinner, the bag will slouch. If you go thicker, the seams become bulky.
Last week, a client asked me to use 2.0mm leather for a tote. When Master Chen sewed the side gussets, the needle snapped. We switched them to 1.4mm with a salpa reinforcement, and it stood up perfectly.
2. Does thicker leather mean better quality?
No, thicker leather does not equal better quality. Quality depends on the tannage, temper, and grading, not just the millimeter count. In our testing, a premium 1.0mm full-grain Italian calfskin outlasts a cheap 2.0mm corrected-grain belly split.
Clients often complain about heavy, stiff bags. I always tell them to prioritize structural reinforcements over raw hide thickness to keep the bag light and comfortable.
3. How do you convert leather ounces to millimeters?
One ounce of leather equals roughly 0.4 millimeters. To convert ounces to millimeters, simply multiply the ounce number by 0.4. US suppliers use ounces, but factories use millimeters.
In my experience, using ounces causes massive production delays. During a recent sample run, a supplier sent us “4 oz” leather that varied from 1.2mm to 1.8mm. I strictly require my team to use digital gauges and record all specs in exact millimeters.